4 July 2020 (W5) - Shaders Are a Nightmare
So strong are my newfound feelings for shaders, and HLSL in general that it's the topic I'm heading this post with. In an attempt to further educate myself and improve my skillset, as well as potentially create useful material for implementing the UI designs into Unity, I began learning HLSL and exactly how to write an actual shader.
I specifically didn't want a simple 'hello world' shader, ala how as a twelve year old any programmers among us made python (or your flavour of accessible programming) spit out a singular line of text. I wanted to be able to stand next to my achievement and know that I made that.
But like most things you want to stand next to and be proud of, it turned out to be rather different to my expectations. I suppose in a cruel sense of irony, I've essentially parented and raised something - albeit for a condensed duration. And much like raising a child, it was illogical, frustrating, and overall an experience I'll say "I don't want to do that again" to but inevitably decide to pick up 5 minutes later.
Finishing the UI Concept
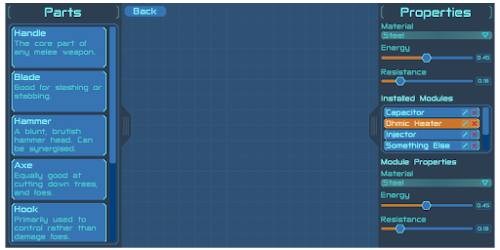
As a short break from shaders, I'd like to share the essentially completed concept for the primary crafting/designing screen.
 |
| I think I'm in love |
Personally, I'd say that my heavy research into UI design and the hours poured into perfecting a sort of color/design 'template' were well worth it!
Writing a Post-Processing 'Blur/Glow' Shader
The overall goal of this shader project was to build a glow shader that I could apply to the UI, and have it only glow from specific points. I wanted to be able to put a mask over a UI element's sprite, dust my hands, and say "Done!" all while having a nice partially glowing button.
The first issue with that is that post processing shaders aren't generally used to create effects on specific elements. Usually the object's material shader does that. It's probably a better idea to do this with the material shader, but when I realised that I was way too far in to stop...
I elected to ignore that issue.
Well, mostly. Admittedly I came up with a function that created a screen sized render texture used for glow alphas based on each individual element's glow map, but I never bothered actually integrating any of that into the shader. I was far too focused on getting the damn thing to work, and work it did! (Eventually)
 |
| It's alive! |
The Technical Stuff
This section may elicit a response of 'what does that even mean?' from anyone without a background in programming (or in my case even shader programming), but I'll try my best to make it understandable.
The shader itself is written in 'shaderlab' which is little more than a sort of render container for Unity's render pipeline. The code is mostly just stock standard HLSL with a few Unity variable references sprinkled throughout.
There were a few major hiccups along the development process of this shader, all connected to one irritating realisation I had - there's no real way to debug shaders.
Anyone who's written a shader probably already knows this. The only way to debug them is to write colours to the screen. Great. I love trying to tell the difference between RGB(0.1,0,0) and RGB(0.11,0,0).
Since in essence shaders are all just maths, computing and shifting numbers that represent colours, it's incredibly difficult to figure out where something went wrong, unless it went wrong catastrophically.
First issue: It just wouldn't work. I don't even really remember why, I'm fairly sure it had something to do with how blitting works, and more appropriately how I understood nothing of what I was doing.
The second issue was that the colours were increasing in intensity rather than just blurring (see below). This was a little easier to fix as it was mostly trial and error combining the three images in different ways (the unblurred base, the horizontal blur, and the vertical blur).
 |
| Not happy, Jan. |
Ironically this was probably closer to the glow effect. But I didn't intend it, so it went in the bin until I got an actual blur going.
The third and fourth issues were related, oddly. I'd noticed two things: the first was that when the size of the blur was below half of the maximum it just stopped working. The second was that a now unused line of code (dividing the colour by how large the blur was to average it) was returning a colour brighter than the input - meaning that the divisor was < 1.0 - and it wasn't supposed to be.
I tried so very hard to fix the actual third issue, even going so far as to map out the functions and their in/out values in excel, using the same formulae as the code. Unfortunately I don't have a screenshot of this, as my computer crashed and excel made the executive decision not to recover it.
Eventually I gave up. I relegated myself to chasing the string that was issue #4, needing that little rush of dopamine that comes with fixing something - anything. As it turns out, issue 4 was caused by the intrinsic function 'asfloat(x)', which converted another numerical type to a float. The trick is, asfloat takes the binary expression of the input x and directly converts it to a float. In float terms, 00000011 != 3 like it does with a hypothetical 8bit integer. So the integer '14' became a number so small as to be imperceptible when converted to a colour value - the lack of debugging strikes again.
After changing all the 'asfloat(x)' calls to implicit conversions via 'float fx = x;' both issues 3 and 4 were resolved! Hurrah! Unfortunately, I never got (or bothered to find) the 'why?' to issue 3. I still have no idea why an explicit int to float conversion managed to screw up the maths only when the blur size was below half its maximum - especially since the maximum had nothing to do with the maths!
Concluding
If you got this far, thank you so much for reading and joining me on the start of this journey. I honestly appreciate any single person that reads through these, and I have fun sharing my thoughts, conflicts, and accomplishments here. This was a little bit of a dry post, so hopefully I'll have something a little more exciting next week.

Comments
Post a Comment